
Cost: $88.95 + $5.95 (shipping) + $14= $108.90 (see part number needed)
Time: 3-4 hours. It should be less with good information
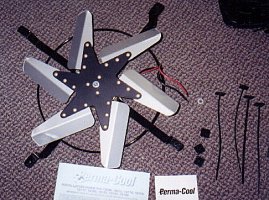
What you get in the fan kit:
Credits: Thanks to Paul, Gary, Ken (all from the Z Board) for their help
Testimony/Discontent from other ZBoarders
You may also need to build a Custom Shroud for your new fan
The space you free up with the fan in - very useful for working on front side of engine:
I had a 5 month old fan clutch that really roared. This mod will seem to do less for those of you with worn down fan clutches which won't have as much drag as a new one does. Please consider this before yelling at me. But if you have a worn out fan clutch, you should probably replace it anyway.
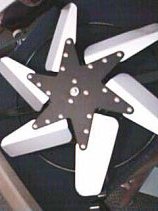
The fan you want
is available from www.summitracing.com. Go there and choose
![]() Online Catalog,
Online Catalog, ![]() Cooling,
Cooling, ![]() Fans;Electric,
Fans;Electric, ![]() Any Vendor,
Any Vendor, ![]() Permacool.
Permacool.
Select
PRM-19115. Cost is $88.95. It's a 16" fan and produces 2950
CFM. The will also need an adjustable thermostat (thermostatic
switch). You can get these at Autozone for $14 (PepBoys wanted
$30). You need an open ended 10mm wrench, a 10mm socket
w/ratchet, wire crimper, and a couple pairs of gripping pliers
(medium-small sized). You will also need an inline fuse holder
and a 30AMP fuse.
The Procedure is as follows.
Disconnect (-) battery cable and protect it from coming in
contact with the (-) battery terminal.
To remove fan clutch: remove four 10mm bolts, best done with open
ended 10mm wrench. Once the fan clutch is removed, retorque bolts
onto the pulley studs. You need them there to keep water pump
pulley on tight.
Remove the fan shrouds (you will no longer need them). Remove the
air filter assembly. Be sure to plug the opened holes with clean
cloths to protect anything from falling in. Now remove the
shrouds in one of two ways.
The LONG way: remove the air filter assembly, and proceed to
remove the front bumper cover. This will make the rest of the
process much much easier. Remove the front fan shroud (can be
done without front bumper cover removed). Loosen the second fan
shroud from the radiator and pull it out of the front of the
vehicle.
SHORT way: pull
off the round fan shroud and pull it straight up out of the
engine compartment. This requires taking off the clips that clip
the shroud to the second shroud. With the second shroud, loosen
it from the radiator and take a saw and cut it in half. Pull out
the two pieces and its gone...be careful not to dent the crap out
of your radiator when trying to loose it out.
In summary, the question is whether or not you want to salvage
your fan shroud. They do no good being in there once the electric
fan is installed, but maybe other Z Boarders would like them. You
can mail them off. You may wish to fabricate your own fan shroud
for use with the new fan.
Before installing the fan, look at the nature of the hardware
(zip strips) and where the radiator and AC condenser are. Plan
how you want to mount the fan. Also look at the how the zip
strips are going to be inserted through the raditor and condenser
and make sure you have a "straight path" to install the
zip strips all the way from one end to the other.
Install the fan: read the installation instructions carefully.
You have all the hardware you need if you purchased the Permacool
except for the wiring and thermostatic switch. Mount it as you
would like. I would suggest centering it. Simply put the four
foam pads on the contacting legs of the fan. The fan has a metal
wire frame with feet that will distance the fan blades from the
raditor approximately 1". These feet would contact the
radiator directly. Put the foam pads there. Now use the zip
strips included to tighten the fan to the raditor. You won't have
to worry about how to put them through the radiator since you
have a downflow raditor (if this isn't the case follow the
instructions in the packaging when installing the zip strips).
The bottom zip strips will be more difficult to tighten up. The
fan is now installed and has two wires dangling off of it. These
wires are connected the thermostatic switch.
Included with the t-stat switch is a nice length of cable and
crimping material (minus the crimping tool). The t-stat switch is
hooked up to a 12V signal. You adjust it to your desired
temperature, and when the car reaches that termperature, it
allows the 12V to reach the fan and the fan turns on. The switch
has a probe which you will install to lie parallel to the
radiator. It measures coolant temperature. You will want to make
sure the probe is at the top of the raditor, since that is where
the coolant is hot. At the bottom of the radiator, the coolant is
cold.
I wired the t-stat switch directly to the 12 V source so that when the car turns off the fan can still turn on if necessary. I later added a switch inside the car, and redirected the wiring, so I could turn the fan off manually. Sometimes the fan ran too long after the car shut off, which could potentially run down the battery.
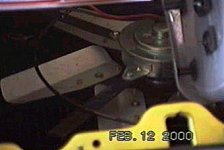
Choose a good
place to mount the switch. I originally mounted it as shown in
the picture below. You may need to drill holes depending on the
location. It is now relocated (see below), where the old intake
plumbing used to go. I put it there using epoxy, and some
patience holding it while the epoxy dried.

Strip one end of the wire that came with the t-stat switch (do
not cut it yet) and crimp a loop electrical connector onto that
end (you will need to purchase two loop connectors...maybe get
more than two in case of screw ups). By now you should have
removed the negative battery cable. Unclamp the positive
terminal, removing the nut entirely. Place the crimped loop
connector on the bolt and put the nut back on firmly.
Take the other end of the wire and wire it up to the front. I
directed it around the cruise, powersteering fluid reservoir,
etc, and used little zip strips to tie down the wire along the
way. After weaving it up to the front, cut the wire with some
limited slack (about 1 foot) and crimp on one of the blade
electrical connectors that comes with the switch. Make sure you
plug it into the correct lead on the switch.
Take the remaining cable and cut a proper length (short) to
connect to the red (+) lead fan wire. Make sure it doesn't have
to much slack, so it won't get caught in the fan when operating.
(The fan wire probably won't quite reach the switch on its own).
Crimp the other blade electrical connector to this length.
My switch came
with two bullet connector ends. It would've been nicer to have
butt connectors. You may want to purchase two or more of these
(14 gauge size at least). I was lucky enough to have the male end
of the bullet connectors at home so I connected the short length
of wire from the t-stat switch to the red wire from the fan with
bullet connectors. You are done with the (+) lead now.
Take the remaining wire (should be quite long) and connect it to
the black (-) fan lead. I used bullet connectors again, and it
may be better for the negative lead since there is no blade
connector. The bullet connector facilitates easy removal. Take
this wire and wire it back to the (-) battery terminal in the
same way you did with the positive. Again, I used zip strips to
tie down the wire. I used them in the same place as the positive
wires to keep it all neat. Cut off excess wire and then measure
about 1 foot from the end on the wire. Cut 1 foot off the end and
attach the inline fuse holder. The fuse holder should be rated
for at least 20 amps. I used one of those thick stereo fuses and
a big 30A gold fuse. After completing the installation of the
inline fuse go to the battery terminal end of the wire end of
this wire and connect an open loop electrical connector (as at
first with the positive lead). You can remove the nut from the
(-) battery terminal clamp and place the loop onto the bolt and
then replace the clamp onto terminal. (-) cable is now done.
The probe comes off the switch on a long curly wire. You need to
mount the probe with the hardware that came with the switch. A
zip strip is included for this purpose. My zip strip broke. The
plastic was very brittle. I had to purchase some new ones from
PepBoys.
After you have the probe mounted you are done. You only need to adjust the switch to operate the fan at your desired temperature. The dial on the my switch allows for the fan to operate anywhere from 34-228 degrees. It can take 3/4 of a turn. Fully counterclockwise is 34 and fully clockwise is 228. So the math says that 194 degrees is spread out between 3/4 of a turn. Each quarter-turn is approximately 65 degrees. Your car's thermostat operates at around 160. You don't really need the fan to kick on before this temperature. So considering the temp of your t-stat, you want to set the switch to turn on the fan a few degrees afterwards. Better even, is to gauge the switch according to when you want it to turn on depending on what your temp gauge says inside the car. When the gauge shows a bit less than middle, I would say you want that fan on. Maybe even two bits before middle. You can mess with the switch until you have it where you want it. Be aware that the fan kicks on suddenly, it may injure you if you have the hood open and your hands near the fan. Make sure you always have proper clearance. Make sure you mount the switch in a place where you have safe access to the dial so you can adjust it while the car is running. It trial and error until you get it right. One problem you may run into, is that the fan runs too long after the car is turned off, even though you've set it at operating temp. To resolve this problem, which could potentially drain the battery, I did this:
You can try setting the switch to just the perfect location, but since the temp. of the days vary, so will the length of time the fan runs after shutdown. I decided the fastest way to remedy this problem without having to continually adjust the t-stat switch was to make a power/current cut-off switch for the fan. Since I no longer use the antenae switch, but I wanted it to stay where it is, I decided to take advantage of it and use it as the cut-off switch. Simple to do, just take two wires, one that will reach about the stickshift to the t-stat switch + lead and one directly from the + battery terminal, drill a couple small holes (big enough for a wire to go through) in the firewall, lead them up to the antenae switch, cut the existing (stock) wires (mine were green) from the switch (with about 2" left on them) , and then crimp the two wires you pulled through the firewall, one onto each small section of wire coming off the antenae switch. You want to route the wires as far from the hot manifold shields as possible and also under the dash (by passenger side left foot) and up into the back of the console. Make sure you screw the antenae switch back in nice and tight (but don't bust the plastic holes) and that the ON position is how you want it....on mine the on position is when the top part of the antenae switch is depressed. Now I can leave my fan at whatever temp I want and if I feel its been on too long, I can just switch it off.
The antenae switch broke soon after, probably because it isn't rated for an amperage that high. So I had to replace it with a higher rated switch, which has been no problem since.
O.K. What will you notice: honestly I hate the roar of the fan clutch. It makes it impossible to pinpoint noises coming from the engine compartment and gives you very little room to work with things. Now I have 8" clearance. The sound is gone and the car runs smoother. The acceleration is much better throughout the band and especially when you get up high. I don't know the exact HP benefit. I can still feel a major difference.
There is no
extra strain on the water pump. An unbalanced fan clutch will
kill a water pump really quickly. Fan clutches also die, loosing
approximately 100-200 R.P.M per year according to some
manufacturers. The switch is adjustable, so in hot weather you
can make its operating temperature 140 to fight off the heat
earlier. If you have the K&N filter there is a small benefit
even for that. My filter sometimes lied on the fan shroud and had
restricted air flow and dirt would collect underneath. No more.
The fan shrouds are gone completely in this conversion. I think
the filter has better breathing now. Though not to significant,
it does. You will probably want to guard it, however, from the
fan, because it will be shooting hot air into your filter, and
any other foreign substance (dirt, water, snow) that will be
pulled up from outside. For ideas, see my freshairintake
I can now hit 60 in second gear without thinking the car is going
to blow up or waiting endlessly. Before, I would hit 50 and it
was a very slow climb to hit 60. So I never did it. Now It can
happen before you notice drag.
I can also hear other cars on the road now. When you race, you
can tell what gear the other car is in. I couldn't before because
of the roar from the fan clutch.
You may have to
install a 90 amp Maxima alternator to support the electrical needs of this
mod. I ran the AC, lights, and radio when I heard the fan kick in
(which you can bearly hear) and it takes quite a toll. It had me
down to about 13 volts on the voltmeter. The Z alternator has
only 70 amps.
Well, if that doesn't say it all, I don't know what does. If you
have questions feel free to ask. I gave the long detailed report
'cause I know short explanations aren't enough. You end up
running all over the place getting small parts you didn't know
you would need before hand. BTW, I did this all without jacking
up the car. Just make sure the front of the car isn't close to a
curb and you'll have enough space to work underneath.
-Dave