
Remember to ask about FRESH AIR INTAKES on Z31.com/board - many have designed great systems.
ADDENDUM TO ORIGINAL PAGE (Original Information Below)
Since I first undertook this project, a few design elements have changed. I've added a small electric supercharger, went with a smaller filter, and replaced my inlets (see below for explanation of inlets). Also, please refer to the instruction below, since they are basically the same. Here are some pics, however, of my new setup.

ORIGINAL INFO
There are many ways to setup a nice fresh air intake. By no means is this the only way you can do this. People have done things similar to what I have done (see Sloan's Setup, which appears easier to do than mine and probably more effective)
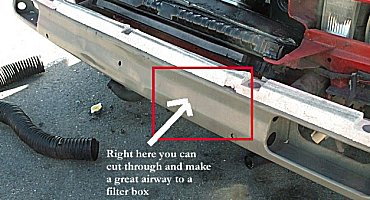
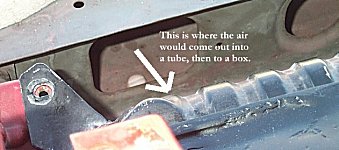
Others have taken a more direct route and cut right into the nose of the Z to make some direct inlets for fresh air. Others have given the intake more simple access to fresh air by removing the metal guard (see ZROCK'S (Frank's) Setup) that bolts up at the top of the radiator. Another great idea is to create a RAM type intake where the tubing is routed into the STOCK air box so it can flow directly into the filter at the highest speed possible, instead of just accumulating into an open space for the filter to feed off of.
I had fun creating my Fresh Air Intake. Read all that had to be done. Inbetween the description of my setup I will add ideas on how you might use the stock air box to make a fresh air intake...those directions will be MUCH MORE SIMPLE and the setup may be more effective.
I am quite pleased with the ease (well, at least the intake tubing and inlets part), looks, and functionality of my design. All the parts are easily obtainable from your local stores, so you won't be searching forever to find these parts. Here's what you'll need (pics included) and ~costs, if you want to follow my setup:
Disclaimer...I did a lot of things on the fly, so you may run into trouble doing this...ASK QUESTIONS if you have them.
Not Optional
~~~~~~~~~~~~~~~~~~~~~~~~~~~~~~
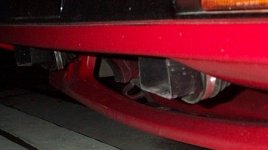
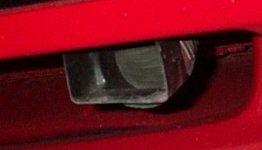
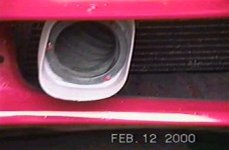
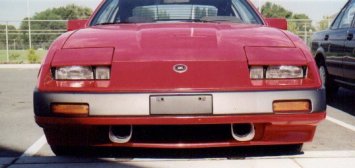
You've completed the inlet portion of the fresh air intake. Look pretty good from the outside.
![]()
What remains depends on your setup option:
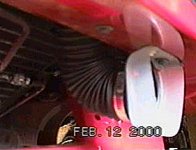
If you have an electric fan and your fan shrouds are off...then you need to shield the filter off entirely (explained below). This is what I had to do!!! Lots of work. The electric fan will lodge debris at high velocity into your filter and if its not sealed off then your routing fresh air does you no good. The air flowing over the radiator is very warm!!! One day in June it was like 100 degrees outside and I opened the hood and pressed on the plastic end cap of the filter. The thing was so hot and pliable I could push it in about 1" or more. Hot air gives quite a lack of performance. That's why we want to block off the engine/radiator air and create a route for ambient temp. air to enter (See ZROCK'S (Frank's) Explanation of why its bad to have hot air as compared to ambient temp air.)
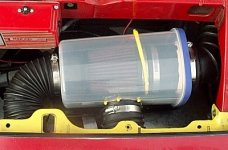
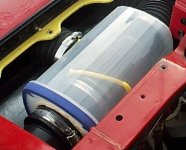
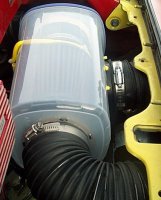
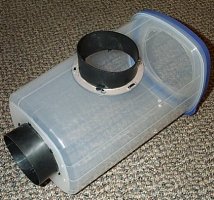
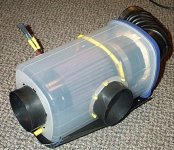
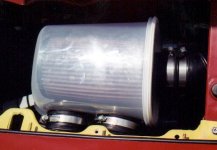
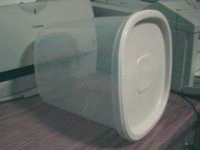
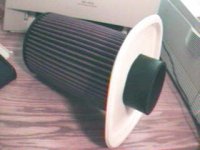
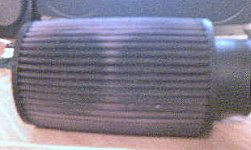
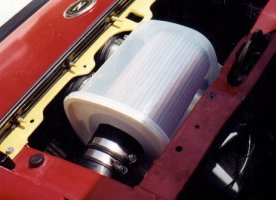
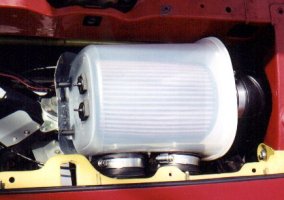
Instead of trying to blocking off all openings into the intake box area, I decided to create a container that would house the K&N filter. That way no hot air would enter at all and it would be a clean small setup. A K&N filter has good dimensions to work with while the intake area has lots of odd spots/openings you'd have to worry about. To make the "new" airbox, I looked for a good airtight, plastic, see-through container. Second, after finding a good container, I found and bought an 8" K&N filter with the same outlet (3") but smaller base cap (5" instead of 6") than the typical 9" filter we buy for our Z's (My 9" fell into my electric fan one day and got chewed up..my fault due to a bad clamp connection, so I had to replace it anyway). The 8" filter fits perfectly inside the 8" deep Tupperware container.
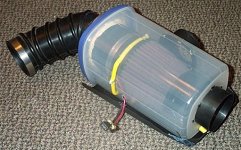
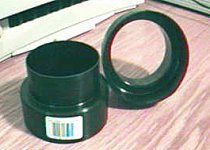
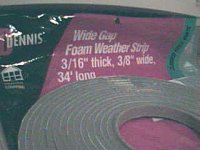
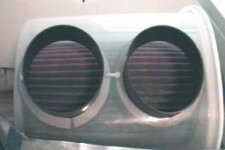
I cut two round holes (3" diameter) for the second pair of dryer endcaps to fit through (using the endcaps as a stencil and cutting just a bit INSIDE the stencil lines) and then used thin weatherstripping foam to seal them. Before making them a permanent fixture to the container, I cut the larger diameter of the endcaps down to about 3/8" with scissors so they don't stick too far into the container...otherwise they would not allow the filter to fit in very nicely. They are held on tight with small cable ties. I drilled enough holes in the inlets and container to get the cable ties tied on in the middle (and joining the two inlets) and on either side. This compresses the weatherstripping foam and hold the inlets in place...now if the tubes are jostled they will just compress themselves instead of jolting the inlets out of position.
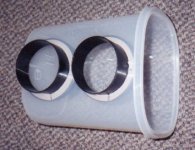
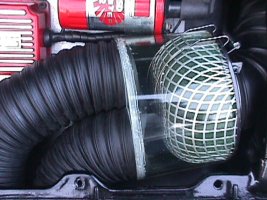
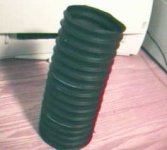
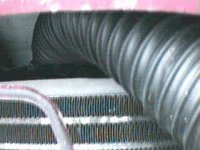
The intake tubing (which you have 3"-4" of excess sticking out from between the radiator/bumper cover) will clamp onto the smaller diameter of the endcaps. These are the inlets into the filter box. So from the intake of the tubing all the way to the filter, there is no way for hot air to get in. I used some screen material to block out any really big stuff from getting inside the filter box, like leaves, rocks, or other stuff.
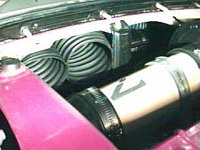
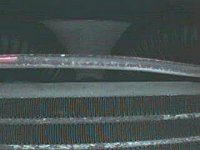
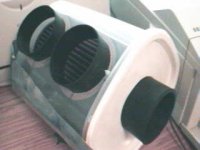
My next step was to guard the Tupperware from excessive heat coming off the radiator. This may not be necessary...but I don't know how much heat that little container can take...plus the hot air might heat up the Fresh Air enough to render this whole project ineffective. To make a shield, I got a thin peice of pretty pliable sheet metal (pliable enough to be manipulated by hand) and went to work. I eyeballed a rectangular peice of the metal about 15 inches x 9 inches. I bent up a flap on the sheet metal about 1-2" high to go around the bottom of the container. Then, I drilled some holes into the Tupperware container and matched the drilled holes on the sheet metal. I then took 3/4" peices of vacuum hose to use as spacers between the metal and plastic container and I used some Radiator Ties (used for mounting a fan, for example) and tied the metal down to the container. This is hard to explain. Here's pics!!!

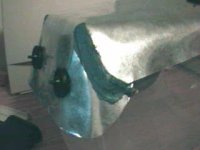
The middle pic shows how I spaced out the container from the heat shield using radiator ties and vacuum hose. You can see through the plastic the little peices of vacuum hose underneath used to space out the metal from the container. On the right, you can see how I sealed up a fold I made in the sheet metal. I drilled a hole through both flaps of metal and used a cable tie to tighten it down. Then I hammered the outer flap until it was decently flush with the other flap and used some Gasket Sealant to seal up the "crack" between them. I bent/cut the metal into shape in order to fold it around the edges. Before sealing up the flaps, etc, take the container out to the car and with intake assembly out of the car, try to place your container in the intake spot to check for a good fit. The shield doens't look to good outside of the car, but its much less noticeable inside the car. You may want to paint the upper side of the sheet metal a flat color before working with it. That way, it will hide the luster of the metal. Paint only the side that will be facing up (w/high temp paint!!!).
Now, . You don't have a lot of room to work with up there, so you need to trim the metal down just right. Mess with it until it fits into the space nicely and doesn't come in contact with an electric fan (if you have one). After you have it nicely shaped, you can either weld the loose flaps together (if you know how and have access to such tools) or you can drill a hole through metal that overlaps and use a cable tie to tighten up the overlap...then use some gasket sealant (generously) to seal it up so it looks "perty". Now you have good heat protection and a nice 3/4" buffer (due to vacuum hose peices) of air between the heat shield and the container so heat that escapes the metal can be lifted away. Almost DONE!!!
Instead of doing a heat shield this way, you could also design one that just bolts into the intake area of the car. Make sure it has clearance from the fan and still gives good room for the air box to fit into. That might be easier and it may look better. I was kinda hoping I could leave the container intact 'cause it would've looked better. If I trusted the container in the raw heat of the Western Deserts then I wouldn't have made this shield. (NOTE: You could avoid a heat shield entirely by going with the Stock intake box idea.)
You now just need to get the K&N to fit into the Container and make the setup steady. You shouldn't have the airbox in the car yet, but you should have tested its size inside the intake area to make sure it fits well. To get the filter inside the container nice and steady, do this:
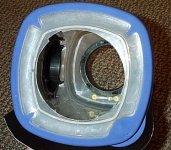
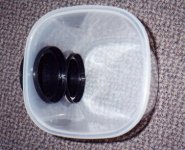
Cut a hole in the cap of the Tupperware container (just under 3" diameter) to allow the outlet to stick out and seal it air tight once that cap is on the see-thorugh container.
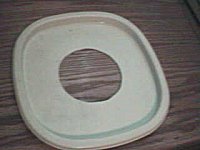
I tried to center the hole to allow the filter to have good empty space between itself and the walls of the container on all ends. This allows the filter to breath easily. You just want to prepare the hole in the cap to use later...you will not be putting the filter inside the container quite yet.
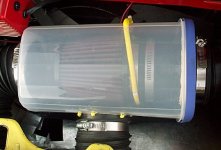
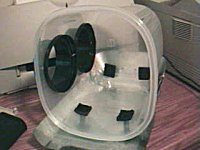
(PICS to the right/below give you an idea of what the filter box looks like completed...it shows inlets on container w/hole cut for the filter outlet, but in these PICS the filter is not yet bound...you won't want to bind it to the inside of the container until you have the intake tubing clamped to the inlets...you will read about this next. The FILTER ONLY picture shows that air is really going into the the fresh air intake at good speeds and the tubes are really drawing in a good amount of air. It took me a while to clean this filter up, but the K&N's are great. After cleaning it looked just like new.)
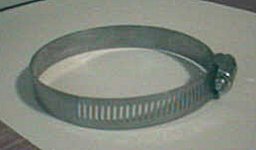
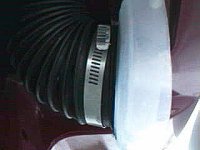
The next part is a little tough...you need to put the plastic container (now w/heat shield) into the intake area and clamp on the inlet hoses. You don't want the filter inside the container, yet, cause you'll want to be able to press the inlets from the inside to make it easier to fit the tubes over the 3" part of the inlets. Once you get both on, clamp them on tight enough to ensure the tube won't come loose. Since the inlets are thin plastic, you don't want to overtighten the clamps. Always remember to put the clamps on very lose before making connections...because you'll either have to undo the connection or unscrew the clamp all the way, wrap it around the connection, and then reconnect the clamp onto itself.
With the intake tubes now mounted onto the inlets of the airbox, you can put the filter into the container and tighten it down. Again, you want clearance on all sides, so however you tighten it down, make sure you don't have the filter up against anything!!! Figure out some way to mount the end of the filter (not the outlet) to the end of the plastic container (opposite end from cap) so that the filter is steady. I used Radiator ties (starting from the inside of the filter) to tie down the end of the filter through the end of the container for a firm fit. To do this, I drilled very small hole into the filter itself and then larger holes in the plastic container (at the end) where the radiator ties could insert and then be zipped down. If the filter gets really dirty, I will have to cut the radiator ties and buy new ones, so if you have a reusable idea, you may want to go with that. The radiator ties are just so simple to use.
Ok., the filter is mounted nice and tight...you have the intake pipe curving out from the AFM ready for a coupler to be used inbetween it and the filter. Get a 2" peice of 3" outer diameter muffler pipe from your local shop and smooth down the rough edges and burrs. You'll use this small peice for your coupler. Get 2 suitable hose clamps, once for the filter and one for the intake pipe. Take the container cap and place it over the outlet of the airfilter, then place a loose hose clamp there. Put another hose clamp onto the intake pipe going to the AFM. Put the 2" coupler inside the filter outlet and intake pipe and make sure 1" is inserted into both sides (equally). Then clamp down and secure the container cap to the container. The container cap may have the tendency to pop of on a couple edges...do what you have to do to secure it...but don't make it impossible to take off or you'll never have a way to get the filter out and clean it.
Oh, you're DONE!!! Cool. Make a final check to make sure everything is tight, clamps are on nicely, you have clearance between heat shield and your electric fan, and especially that everything from the filter into the AFM are secure and air tight!!!
I like the outcome of the setup. It looks pretty good, and the intake inlets on the bottom of the car look pretty aggresive. I am very satisfied...though many other ideas seem great, too. I advocate trying to create a fresh air intake by means of different approaches...
If I had to do it all over again, I would use the stock air box to do this mod. You can imagine how much easier it would be...you wouldn't have to worry about making a shielded container. You would save quite a bit of money. You would only have to worry about the inlets/scoupe, and some way of routing all the air into one tube and into the STOCK airbox. The RAM idea seems best, taking the two tubes, joining them into one (or simply making one big scoop instead of using tubes), then bringing it all together INLINE with the stock air box opening (and using a K&N filter box replacement instead of the paper type filter). Or if you're really gutsy and want to take a chance, you could cut directly into the car and put an air scoupe in that would feed the stock airbox directly.
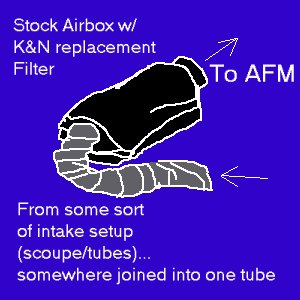
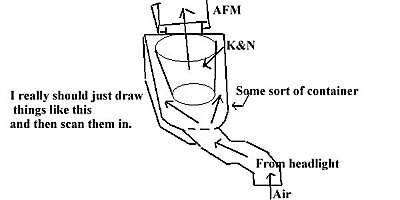
Nice Pic, heh??? You could use this high heat hose (a 4" peice) to cumulate the air from whatever setup you design to suck the air in from the air dam...be it a scoupe or a couple other hoses somehow joined into one (branching coupler???). If you don't already have a $50 Investment in the K&N Cone Filter, I would suggest the RAM route, but it hasn't been done that I know of so don't blame me if it doesn't work out...I don't see how it couldn't be better than the stock setup where the air is taken from a smaller inlet and from the back of the headlight bucket!!! Horrible design element there!!! Notice from the drawing that the airflow would be curvelinear. I worry about my setup and how the air just gets mashed into a container perpendicular to the flow thats going to be achieved. Luckily, air is shifty and and likes to go where its being sucked.
Other ideas:
Another thing you may want to consider...instead of going with the longer K&N filters, you could get one of those little K&N's that come w/POP-CHARGERS. They are only about 4 inches deep...this would allow you to use a smaller container and make the setup a bit cleaner. Stanos can help you find whatever specs. you want for your air filter...9"/8"/6"/4" long, varying end size diameters (5 3/4", 6", etc.), different outlet diameters, different tapers, etc. You would have a better chance of finding a HARD Plastic (Like in Sloan's Setup) that is more heat resistant that what I supposed the Tupperware container will be.
Finally, I guess you're all wondering if this helps??? Well, as Fresh Air Intakes do, it won't help you gain HP, but it will maintain HP once the engine warms up...your car will continue to intake the same temp. air as it does when your car first starts.
Results from the first test drive: I honestly can tell you I felt a good amount of pickup right away!!! My car was warm when I finished this up and it was about 95 degrees outside. I had just been driving when I put 30 minutes into the final stage of the fresh air intake setup and then I took the car for a spin. I felt a noticeable difference. My idle is about 100 RPM higher than it was before. Once I hit the gas and get up to my 3K (since I have intake and exhaust mods 3K is the "kick in point") I feel a nice boost...not enough to shave seconds off my times, but a nice boost. At high RPM I couldn't feel as much difference as I could at 3K, but it wasn't worse than before. If anything, it was better. I can now drive all day long and never feel a major lack of power due to hot air burning inside the engine. My engine temps have even been down considerable...~10 degrees!!!
So was it worth the pain...ALWAYS!!! If you consider all costs of my setup, you're looking at approximately $80...that's if you had to buy everything including the tin snips, an 8" K&N filter w/3" outlet, and other odds and ends you may already have or have access to. If you go the RAM way with the stock air box, you're looking at $43 for the K&N rectangular replacement filter (I'm guessing on that one based on what I paid for our '91 MAXIMA) and only about $20 for the intake parts (if you go with the tubing and not a well formed scoupe idea).
GOOD LUCK. I had fun, the feel is good, and the look is killer!!!
-Thumper300ZX