KOYO RADIATOR REPLACEMENT
-- RESOLUTION for POSSIBLE FITMENT ISSUE --
Thanks to CZP for products (link to product shown above) and to Joe(Nova) for TT.net Replies
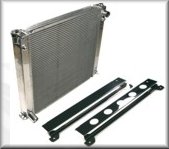
The Koyo radiator upgrade is pretty much supposed to drop in and fit according to normal replacement procedures, aside from removing the hardpipe bolts to give a bit of room to slide it in and requiring a new bracket or bracket modification. A nice new radiator bracket like that from CZP (Coz) should fit right over the top. In all, 30 minutes to an hour to replace the radiator would be expected.
After installing an upgraded front anti-sway bar (in about 2 hours, thinking it would be 4 or 5), I decided to move onto the radiator thinking it would be miscellaneous. It turned into an on-and-off 12 hour + ordeal (started around noon one day and finished the next afternoon!). SO READ THIS and save yourself some time!
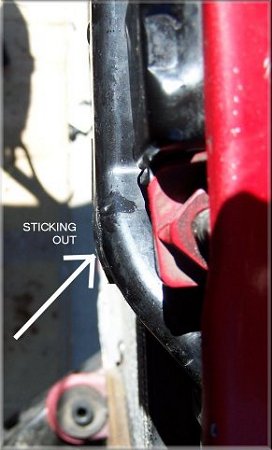
Well, some of us aren't so lucky. Here's what CAN happen...this is rare. Once you have the stock radiator pulled you will remove and reattached the cowling to the new radiator. Then you'll drop in the new radiator only to find that it won't sit upright and against the weatherstripping on the sides. You will try to move things around with no luck - the bracket will fit poorly and you will have gaps all over the place (see pictures below). After some time, you will find you have to pull the radiator back out to figure out the problem. TO AVOID HAVING TO DO THIS, FIRST check the black, plastic harness tube/holder that is bolted up along the radiator crossmember. Make sure that this harness is not sticking out to far, or if it is, that there is some play with it and that it can be EASILY pushed back. If you have play or it sits back along the crossmember, move along with the radiator install.
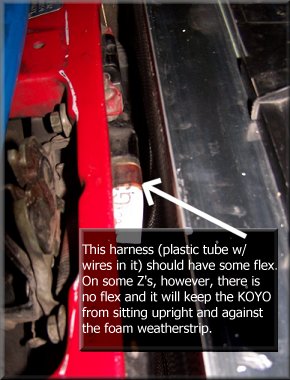

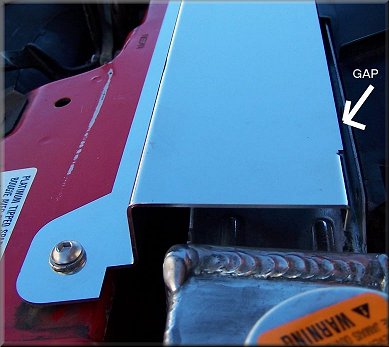


If the harness sticks out and won't budge with minimal pressure, the radiator will rub up against the bottom edge, which will cause the radiator to lean back toward the engine. You will not be able to set the bracket on right and the shroud will also be leaning and will probably cause fan contact. You will also have problems with the overflow outlet rubbing up against the intake hardpipes.
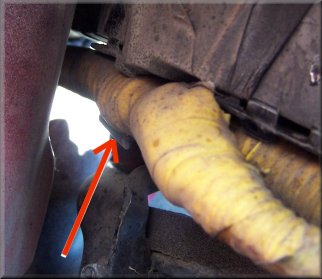
If the black harness tube is stubborn, you'll need to find out why. In the two cases I've seen (tt.net member Joe(Nova), and mine) the airbag harness that also runs along the front crossmember was pinched between the condenser fan and the black tube which didn't allow the flex needed to get the radiator set in correctly. The airbag harness is about 3/4" thick, plenty enough to cause the fitment problem. You'll need to pull off the nose cover for access. The airbag harness has yellow tape all over it -- there is a harness connector that you need to unplug and reroute around the upper-left arm of the condenser fan (picture below). You may also want to make sure the harness is clipped into the plastic, semi-circle clips seen in several places (the one below is off to the left of the condenser fan, a bit hidden...mine was loose here).
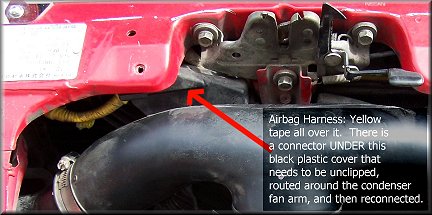
You MIGHT be able to access this harness without removing the fan, but I found that tough and removed the fan. NOTE - it took me hours to figure this out, so hopefully this will save you some hours : ) The harness connector is behind a small plastic shield held on with one 10mm bolt and a phillips head screw. Remove this shield. Unplug the airbag connector - NOTE: you may want to disconnect the negative battery cable JUST IN CASE. I don't know what kind of reactiong to the system unplugging this harness MIGHT cause. I had the battery connected and nothing happened, but it's a safeguard. If you removed the fan, reattach it now. Route the harness around the front of the fan arm, then connect. You won't have great access to those screws for the little black cover anymore - I just connected the 10mm bolt and called it a day.
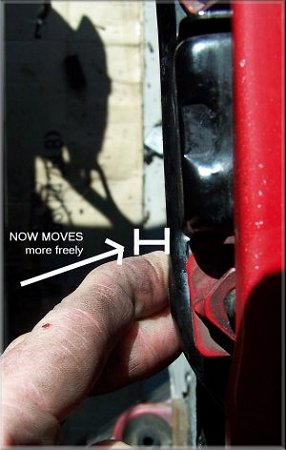
The plastic tube itself is connected to the radiator crossmember with two 10mm bolts. I took a screwdriver and hammer and bent back the ears the bolts go into. This way the bracket was being held back on it's own instead of requiring pressure from the radiator.
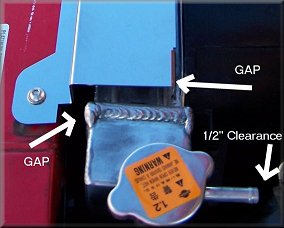
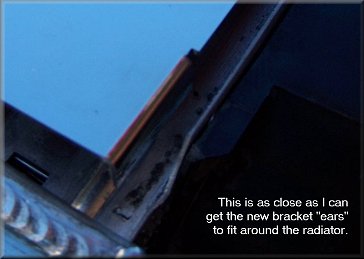
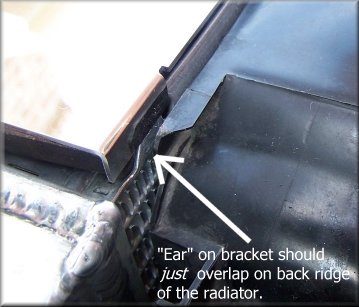
After doing this and getting things back together, proceed with normal radiator installation. Make sure the radiator sits up against the weatherstripping, but also that it doesn't go SO FAR as to rub up against the two AC consendser retaining screws (near the top). You don't want to put a hole in your nice new aluminum (soft) radiator. Your installation should look approximately like this. I believe the small ears on the bracket should just overlap on the upper ridge of the radiator to keep it from sliding back toward the engine, while also holding the rubber bumpers in place.
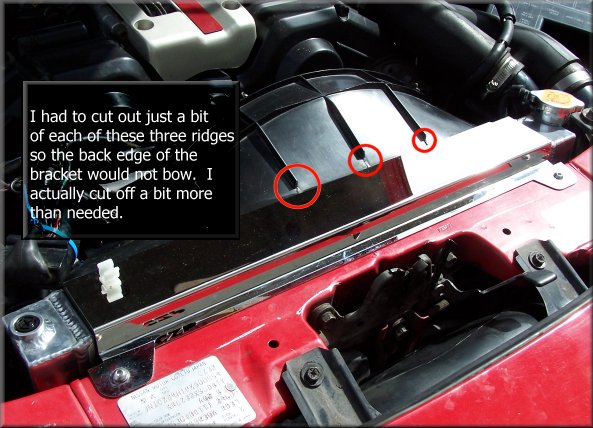
I had to cut out a bit of the raised plastic (spines) on the shroud to keep the back edge of the radiator from bowing. Now it sits evenly and flat along the back edge.
Again, this is a rare situation I believe, but after posting a few times about this problem, I did other TT.net member who had the same problem [Joe(Nova)] -- too bad I found out from him AFTER trying to fit the radiator in, for hours!
Note: I did not have to modify my lower shroud as some have had to do. I did have to cut hoses down a bit for proper fit (avoid kinks).
ONE OTHER GOOD TIP for radiator installation - you'll have the shroud attached when you drop the radiator, so the back side fins will be safe from being damaged. However, the front is fully exposed. I used one of the flat cardboard covers that came with my radiator, taped it along the side rails of the radiator with 1/2" masking tape, dropped the radiator in, then pulled the cardboard straight up and out. This way this is no chance to bend fins or gouge the radiator as you drop it is. Since it's a bit tight at first, it's a great way to protect it.
HAVE FUN - it's all great when you're done!

FINAL PRODUCT