IAA Unit - Leak Repair
(set aside 1-2 hours +
curing time)
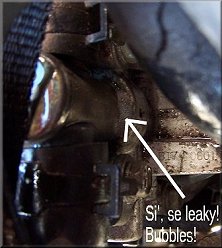
A fairly common problem with the IAA (Idle Air Adjust). Several members have found a leak where the top "T" tube connects at the top of the unit. While performing a boost test you might hear this leak, located on the back of engine on the driver side. I have never had a problem with idle adjustment and I could still hold 15 psi of boost with this leak. But you've gotta fix boost leaks (And I'm sure the leak would cause idle problems in the future). Anywhere you have a boost leak, the turbo will have to work overtime to reach the set boost. While pressurizing the intake to 5 psi, this leak would bleed off the pressure to 2 psi in a matter of about 10 seconds. Though the turbos wouldn't be working too much extra to keep up, every bit counts!
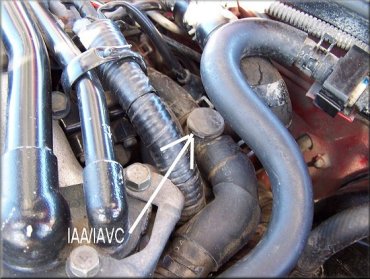
To remove the unit, follow the IAA Unit Replacement at TT.net. Remember to get an IAA gasket before removing, or you might have to wait longer to reinstall. This is a fairly simple procedure. I know these long winded writeups can make jobs seem harder than they are -- just trust me, you can do this. Read through the entire procedure to make sure you have all you need to perform the repair...most DIY'ers will have the tools I used.
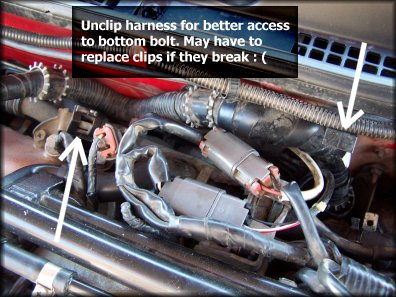
A few tips I have for removal of IAA:
|
Having removed the unit, clean up whatever you can. I plugged the IAA hole off the manifold and cleaned up for a few minutes (diluted Simple Green solution and toothbrush).
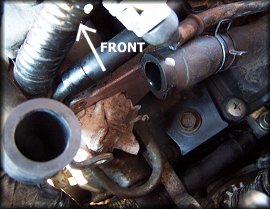
The chore is to remove the tube at the top. I don't think this peice was press-fit like originally assumed - if it was, it didn't take much pressure to press it in. Nissan probably used a bit of glue to keep it sealed around the edges.
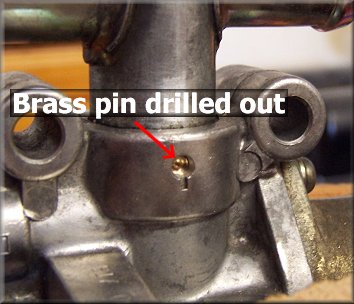
There is a retaining pin (brass). Get a 1/8" drill bit and drill it out. I have a cheap little drill press that came in handy -- with a drill press you can adjust how deep you go. You want to get right down to the tube to make sure you aren't fighting the pin while pulling the tube.

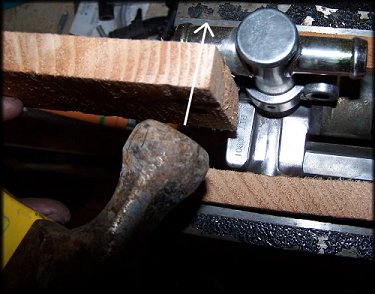
Then I put the unit on a vise, using pieces of cedar fence slats. Cedar is great because it is soft and will not likely damage metal. It also "molds" around any contours for a better grip. Then, with another peice of wood against the tube end, give some LIGHT smacks -- too much force and you could bend the tube, tube ends, or break welded seals. Alternate from one side to the other and in opposite directions. If you don't alternate you might spin the remaining section of the retaining pin and scratch the inner surface of the IAA body. The tube should loosen up with just a few shots to each end. You can use a wood wedge with tapered edge (see picture) and a hammer to get the tube started in the UPWARD direction. Then, just twist side to side while pulling upward -- the tube should pop right out (I've only done this once, so who knows ???)

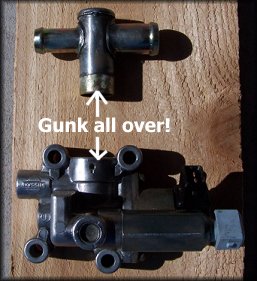
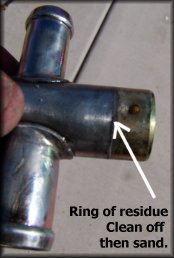
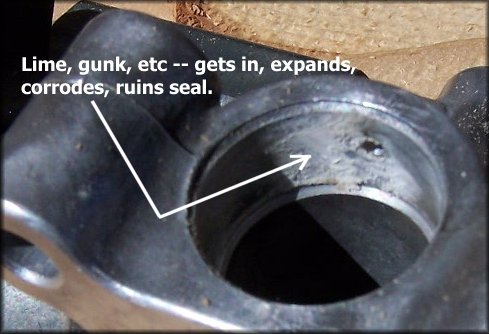
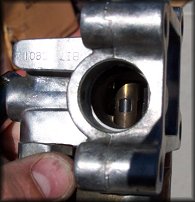
Quickly you will see how the unit was leaking. Some corrosion was introduced either around the top or through the retaining pin (which was NOT sealed). There was a bunch of black and white residue that pooled up around the top (dirt, oil, lime/hardwater stuff) and through the pin hole, which then of course took it's toll by corroding metal and expanding between the pieces to allow a leak.
Clean everything up. I polished the IAA a bit and used plenty of WD-40 and throttle body cleaner to clean up the unit. I also removed the F.I.C.D. and A.C.C. pieces to clean them up. May as well. Mine really was not very dirty at all (my Z31 idle unit was much worse when I cleaned it out -- carbon and oil all over the place). I took a dremel and made the unit look a bit nicer. I continuously cleaned the unit and blew the parts dry with a compressor. If you take it apart, do so in a safe area where you can find dropped pieces (small springs, etc). I used some teflon tape on the F.I.C.D. when I screwed it back in - probably not necessary, but certainly won't hurt.
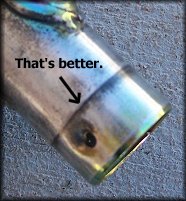
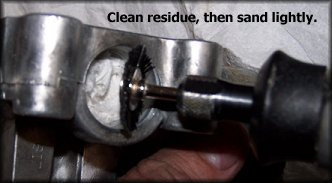
Clean off the bottom of the tube and the top of the unit. Make sure each is very clean and do some light sanding (around the tube for horizontal scuffs) to provide a good adhesion surface. I used a plastic dremel brush to clean out the IAA unit. To keep chunks of gunk out, you can plug up below with a peice of kleenex or something -- you'll be cleaning again anyway.
BEFORE PROCEEDING, MAKE A FINAL
CLEANING on the parts with some TB Cleaner, Let sit or Blow Dry
&
WASH YOUR HANDS THOROUGHLY
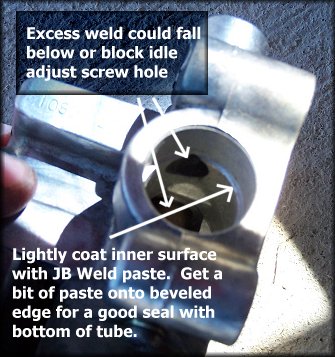
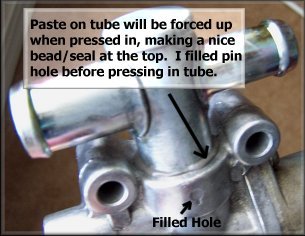
Mix just a dab of JB Weld paste - it won't take much. I used several clean toothpicks for application. I put a very light coat in the IAA unit, making sure the paste sat down on the beveled edge. You don't want to go too heavy on the inside because when you push the tube down, it will push the paste applied to the inside down into the chamber. IMPORTANT NOTE: If you cover up holes or moving parts inside the unit with the paste, it could screw up your IAA performance. So, apply just a light coat and scrape off any excess with a clean toothpick. On the tube itself, you can be a bit more generous because the paste on the tube will be forced UP toward the top as you push it down. This will also result in a nice bead along the top seam. Unless the bead is really thick and messy, just let it sit and cure as it is. No reason to interrupt the seal.
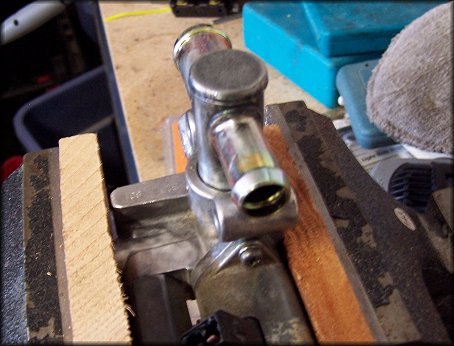
I also filled the little PIN HOLE before pushing the unit in so it would seal up the hole. No reason to use a new pin (which you would have to make yourself, anyway). While you push the tube into the IAA body, make sure you seat the tube fully and use a twisting motion as you push it down to set it up tight and to create a nice seal between the surfaces. Also, remember that the tube needs to be oriented as it was originally to accept the correct hoses (large hole toward driver side and small hole toward pass side). I recommend setting the tube only once (don't remove it) or you could end up with an air void in the paste seal.
As an added precaution against JB Weld getting down in the unit, check the position of the idle adjust screw, mark it (for simplicity of reseting idle), and remove it so you can see inside the unit for any excess. You might be able to remove any excess safely with a clean toothpick. Keep the unit UPSIDE down while the JB Weld sets -- this should help keep any excess from falling into the chamber.
Because the tube already fits fairly tight inside the unit, the thin amount of JB weld will set up quickly, so get the tube situated nicely right away. As pictured, I see no way for this repair to fail in the future. The weld is filling an extremely small void between the tube and IAA body and the bead at the top should only help - the seal should have suitable pressure resistance for anyone pushing 2 or 3 hundred psi through the turbos : )
That's it. Let it dry for 12 hours, then put the unit back in. It should be fully cured. I would let it dry for a day or so (without driving) before doing another leak test. Do make sure you retest for leaks at some point. NO LEAKS!