Z32 DREMEL METHOD INJECTOR REPLACEMENT
with basic injector diagnosis || The Argument for Dremel
Method Replacement
Don't ask me what Nissan was thinking when they ALMOST designed a plenum that makes it possible to remove injectors without plenum removal. Luckily, someone recognized a way to modify the plenum to make it possible.
I think the following will help
those feeling apprehensive about the GRINDING into the plenum to
access injectors. BY NO MEANS is all this information necessary
to complete this job. In fact, if you are already ready to go at
it, here is a link to the writeup (done on an Infiniti J30) I used when I did my first 300zx Dremel method injector
replacement.
INJECTOR DIAGNOSIS
An important part of continued maintanence is diagnosing your fuel injectors. An out of spec injector can go unnoticed. However, when an injector goes totally south, you will have an engine running on 5 cyliders. Your car will sound and run like crap.
Though this article will only cover injector issues, you should note that losing a cylinder doesn't mean that you have lost an injector. It could be a coil pack, low fuel pressure, bad wiring, spark plugs, connections to other devices like the PTU or CAS, or those devices themselves (and more). You can search terms like "BALANCE TEST", "HESITATION", "COIL PACK", "PTU/CAS DIAGNOSIS" on twinturbo.net for plenty of information on diagnosing other causes for loss of power/cylinders.
Here we are only going to discuss basic the diagnosis of bad injectors (no bench test stuff, spray pattern, etc). The first, simplest way to check for a functioning injector is to confirm they "CLICK". When injectors open and inject fuel, they click. Take a long screw driver while the car is running and put the end on the injector retainer cap (will probably help to have throttle/collector cover removed). Put the handle end of the screwdriver to your ear and you should hear distinct clicks. If you do not hear clicks from an injector, further diagnosis will determine the solution. Even if all of your injectors are clicking, it's a good idea to go onto the next step to diagnose them further. Injectors can click and operate even when out of spec.
Next, each injector can be tested for proper resistance from the ECU harness and directly across the injector terminals with a digital voltmeter (reliable DVM is a must for this). I recommend testing the injectors from the ECU harness first. By testing from the harness you are also testing to make sure the wiring is good through the ECU harness pin to the injector itself. As noted in the FAQ on what can be tested from the ECU harness:
"Nominal resistance is 10-14 ohms per FI. You need to test the ohmage between pin/wire #58 (common positive) and the following pins for each injector"
| FI #1 - 101 | FI #3 - 103 | FI #5 - 105 |
| FI #2 - 110 | FI #4 - 112 | FI #6 - 114 |
I believe 12-14 ohm is a more specific accepted range. Access the ECU and remove the wiring harness (see ECU Diagnostics for instructions to access ECU). Remove the three additional screw that hold the ECU down, then remove the harness from the ECU with a 10mm socket. When reinstalling ECU later, take care when plugging in the harness and DO NOT overtighten the 10mm bolt.
I use small test clips or thin paper clips to make contact with the ECU harness pin-holes. Don't be too rough on the harness or pin-holes -- you want to keep the harness it in good shape for solid pin connections. Set your voltmeter to read OHMS, connect your red lead to lead 58 and black to FI lead you are testing (although I don't believe polarity matters in this case). Be certain you are contacting the right leads. If you test certain devices, the voltage you are applying can hurt them!
PICTURES of ECU TEST COMING
If you test an injector from the ECU harness and it returns a value within 12-14 ohms, you know your harness and injector are good. You could still have intermittent injector harness connector problems that might need to be addressed, but most likely you have confirmed everything to be good for that injector. If you test an injector from the ECU harness and it returns a value higher than 14 ohms, you either have a harness/connector problem or an injector problem. RECORD the ohm value for each that is outside of spec, because you can use this information in the next step.
If all are diagnosed within 12-14 ohms, you likely have no injectors to worry about. If bad, you can proceed to test any that show out of spec directly at the injector. Remove the throttle cover and test any injector by removing the connector and using your multimeter across the two injector terminals. If it tests 12-14 ohms, you have a harness/connector problem that will need to be addressed. If the injector tests outside of 12-14 ohms, you have a bad injector that will need to be replaced. Compare the value to the recorded value in the first step. If you read, for example, 50 ohms from the ECU harness for a given injector, and it reads 30 ohms right at the injector, this could indicate that you have both an injector and harness/connector problem (30 ohm resistance from injector, and 20 through harness). Harness resistance should be ZERO and the resistance read from the ECU harness should be equal to what is read directly through the injector pins.
It would be good to be extensive and check each FI connector during this process anyway -- fix any questionable contact issues ones by cleaning corrosion or replacing the connector and using di-electric grease to further protect the contacts.
You should now know if you have injectors to replace.
I'm not 100% positive an injector
will operate incorrectly outside of 10-14 ohms. When
troubleshooting for detonation, my #1 injector showed 40 ohms
across the pins -- but after replacement, the car ran exactly the
same, maintained the same fuel pressure, and I still had
detontion. The problem ended up being bad fuel and many gas
stations I was visiting...changed stations one last time and
detonation was gone. Anyway, it's probably a good safeguard to
follow the suggestion to replace any injector outside of 10-14
ohms - it's $150 vs. $xxxx.xx to replace/rebuild an engine. Also,
an injector reading 10-14 ohms may still not be operating
properly - it can be clogged (reducing volume) or providing a
poor spray pattern/mist. With a balance test you should be able
to deduce those cases, and clogged injectors would likely soon
fail and show higher resistance.
PARTS/TOOLS/COST
As noted in above links, you will need your replacement injectors and associated o-rings - this is the pricey part. I would personally get new injectors, OEM if not upgrading, and known, reliable upgrades if upgrading. I also suggest picking up replacement injector connectors (to splice in) and possibly coil pack connectors (all available from TT.net's group of life-saving sponsors).
Aside from basic tools everyone should have (screwdrivers, socket set, pliers, etc) you will need the following tools:
Replacement Hex Screws (as noted in TT.net writeup)
Dremel Tool with Flex Accessory (or other suitable rotary tool)
Dremel #115 Grinding Tip & optional Polishing tips (cosmetic)
QUALITY, Brand New #2 Phillips Screwdriver (LONG)
Ball-end hex tool (4mm or 5/32, preferably LONG with T-Handle -- long 5/32" may be easier to find/same size)
avaiable Shop Vac and Air Compressor
....and I suggest having the following:
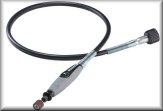
Good Light (halogen tower lights or other) and a Mini-Flex Flash light (pictured)
45 Degree Bent Nose Pliers (quality steel)
Indumar FUSION TAPE (see below)
Di-Electric Grease (.99 packet at parts store counter, though you could likely use a tube for future use)
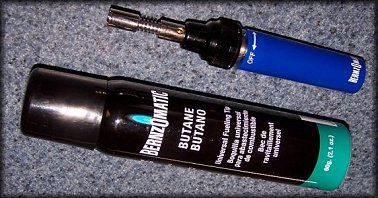
Butane Torch (Great Tool) and Shrink Wrap Butt Connectors (or appropriate soldering stuff)
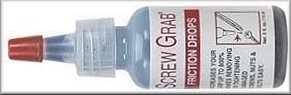
ScrewGrab Compound ($5 - Link - see more detail below)
Fusion Tape (or PREMIUM 3M Electical Vinyl Tape -- Cold Tape is also supposed to be good).
Magnet Tool (could be very useful)
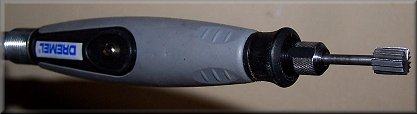
You'll need to have a Dremel tool - I purchased the variable speed Multi-Pro from Home Depot, as seen here. I also recommend purchasing the Dremel Flex Tool accessory. As you are working in a pretty tight spot, you'll want the advantage of the thinner handle. I actually purchased a Dremel kit that INCLUDED the flex tool - it was under $100.
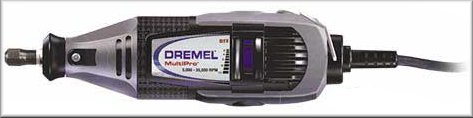
If you are worried about paying out $100 for a Dremel tool only to use it for an injector replacement, DON'T WORRY -- this is a GREAT TOOL to have and you will find yourself using it for many household and automotive uses...at least I have. I was worried I wouldn't use it, but I've used it a ton. I also picked up a "million piece" Dremel kit (generic) at Costco for something like $15.
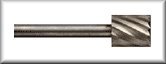 I used DREMEL bit #115 as used by
several TT.net members. This bit worked very well and provided
plenty of control for grinding. The preceeding link above shows
recommended RPM settings for the #115 bit used on aluminum. I
don't remember what I had my Dremel set to...I guess it was set
to "comfortable" (speed up until it feels unstable,
then back it down a bit). This was one of the first times I ever
used a Dremel tool - it doesn't take an expert to use one of
these. Remember to hold the Dremel or Flex extension handle
firmly -- Dremels do like to "skip" around if they hit
rough spots, corners, and curves.
I used DREMEL bit #115 as used by
several TT.net members. This bit worked very well and provided
plenty of control for grinding. The preceeding link above shows
recommended RPM settings for the #115 bit used on aluminum. I
don't remember what I had my Dremel set to...I guess it was set
to "comfortable" (speed up until it feels unstable,
then back it down a bit). This was one of the first times I ever
used a Dremel tool - it doesn't take an expert to use one of
these. Remember to hold the Dremel or Flex extension handle
firmly -- Dremels do like to "skip" around if they hit
rough spots, corners, and curves.
The price for the job depends on what tools you already have and which you need to pick up. I already had my Dremel tool so I just needed to pick up the carbide grinding bit. I also bought a ball-end hex tool (ball-end is VITAL because of poor angles), a pair of bent nose pliers, new electical connectors (broke the Air Regulator connector and replaced the injector and coil pack connectors), a 99 cent pouch of di-electric grease, new hex screws, a new #2 screwdriver that did me no good, and of course, the injector. An assortment of screwdrivers and pliers came in handy. A magnetic tool to pull out dropped items is a good idea, too.
PROCEDURE
First off, and this can NEVER be emphasized enough -- YOU ARE WORKING WITH A VOLATILE FUEL SYSTEM. Be smart and be safe. Have a suitable fire extinguisher handy. Follow all safety precautions and warnings provided by NISSAN and any supporting documents/links provided in this writeup! WEAR SAFETY GOGGLES -- you will be grinding and aluminum shavings could easily get lodged into you eyeballs! Also, injectors have been known to SHOOT OUT if the rail has residual pressure. The injector could turn into a bullet and fuel could follow.
The only reason you are going to use a Dremel to grind away at the plenum is to give you access to injector cap screws. Once you can remove those, the method of replacement is the same as normal. (See plenum removal/injecotor replacement steps 17-19 & parts of 33-38)
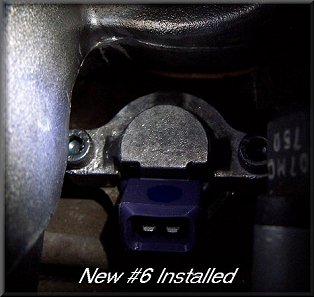
Looking down into this spot, I thought for sure the #6 injector couldn't be done with the Dremel Method. I'd have to pull the plenum. I read a few posts where people said they did the #6 injector and decided it was worth it to try. After asking a few times, someone provided the .pdf writeup of a #6 replacement. I got some appropriate tools and went to it. I'm sure 2, 3, and 4 would be similar, just some small differences in angle and how to approach the screws. #5 looks darn near impossible, but so did #6 at first.
Here is where I get to skip a lot
of writing -- the .pdf is provided here --> (The Glorious Dremel Method Writeup - Chris Fowler). Read this thoroughly; then read it
again. You will likely be nervous to start grinding away at the
plenum, but just take it easy and you'll be succesful. I have
added Z32 specific pictures and my own suggestions below to
facilitate your injector replacement. NOTE: the
replacement shown in the link above was done on an Infiniti J30.
Though some of the pictures, fuse box, connectors will be a bit
different on your Z, the procedure is extremely similar. Follow
instructions on TT.net for relieving fuel pressure.
PERSONAL EXPERIENCE and SUGGESTIONS
Remove any accessory items around the injector area to provide better access. Mark as needed, and reassemble after you have the injector installed. I unhooked the Air Regulator connector and hose. I did not remove the balance tube, though it probably would've made it a bit easier. I also did not remove the throttle cover -- I guess it wasn't in the way for #6, but it would surely help to remove other injectors. With the #1 injector (no grinding needed), removing throttle cable bracket gives you better access to the area.
Removal/Replacement of Injector Connector
Removing the injector connector/plug for the #6 injector was the most time consuming part of the replacement procedure. I was trying to save the connector, but the wire retaining clip that holds it on would NOT back out. On my car, the clip hits into the fuel rail while backing it out. Many say that you can pry lightly with a screwdriver and get these connectors loose without removing the clips, but I have personally NEVER been successful in doing so. I've broken several brittle connectors trying.
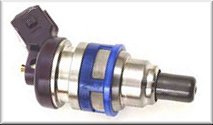
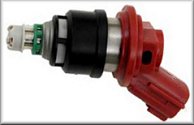
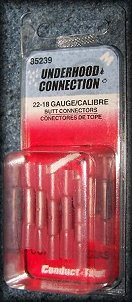
After a good hour of trying, I finally decided to just bust it out and replace it with a new one (splice one in), which is probably a good idea anyway. You can order injector connectors a few different ways. I personally decided to get these individual connectors (see below), which are immediately ready for use and have a nice rubber boot ($86.70 for 6, while the others are $43.98 for 6 but need to be separated and sealed right up to the connector).
![]()
I spliced into the existing wiring by cutting off a good portion or wire and the original connector, stripping the new ends, and connecting them into the new connector with waterproof, shrink wrap butt connectors (Checker, see product below). After crimping, you shrink the ends (micro butane torch works nicely). They also emit a clear sealant (see at connected end). I'm confident they will keep out moisture. I also wrapped these new wire sections with Fusion Tape up to beginning of the rubber boots (see further below).
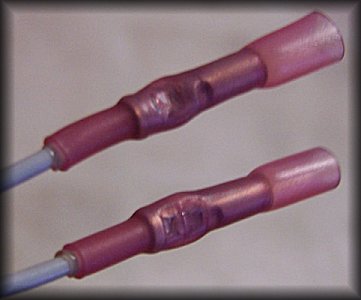
You might want to do a more reliable job by following this incredible splicing procedure. I feel the butt connector will do just fine, and there is no risk of overheating wires if you suck at soldering (I was not confident enough, personally).
I also suggest replacing the associated coil pack connector if it appears to be in bad shape or has corrosion. Any poor connection could cause premature failure of associated parts, along with causing poor performance. I used FUSION TAPE to wrap up wiring to protect from heat and moisture. FUSION TAPE (Indumar products) is really amazing stuff. It feels a bit tacky, but doesn't stick. You stretch it while wrapping it on, and it FUSES to itself making a perfect seal. It's a bit pricey, but goes a long way.

Grinding Guide
As noted, you will likely be a bit nervous about grinding into the plenum. That makes sense. But it's really no big deal.
THAT BEING SAID, since YOU are DREMELING and not me, YOU are RESPONSIBLE for how deep you go. I would certainly say it would be better to remove the plenum than to cut through it : ), leading to plenum replacement.
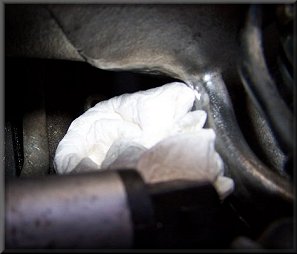
As long as you take it slow and recognize the "geography" of the plenum area you are grinding, you will be fine. Before you start to grind away, make sure you put some paper towels down around the injector and surrounding to catch as much of the shavings as you can. You will end up cleaning this all up thoroughly, of course, but it will make it a bit easier if you use some paper towels.
You may even want to preceed all this by cleaning the surrounding area of oil and dirt so the shavings won't end up sticking to everything. As you will see below, I didn't clean enough beforehand, which made cleanup after grinding a bit more extensive. If you do clean up, just be careful not to get electrical connectors wet -- Z's hate that.
Onto the Dremeling.
Go at it, just be cautious.
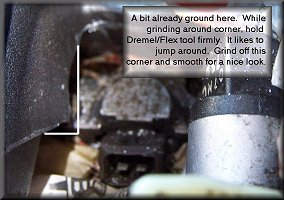
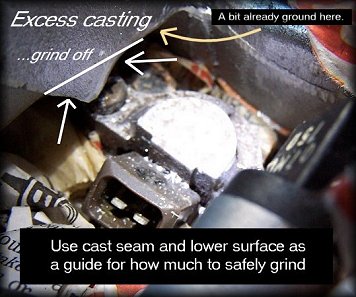
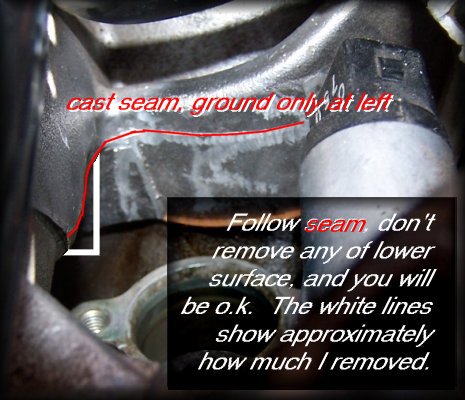
There are copious amounts of excess aluminum just waiting to be ground off. Here are some pictures of my work - I suggest using the seam of the cast (use your finger to feel this seam) as a guide to know how much you can grind off safely. Below this cast seam, I did not remove a bit of metal (the original texture is untouched under the seam). I assume the thickness of the plenum above the seam, where I Dremeled, is still as thick as below (also assuming the cast does not have overlap). There is a thick edge of extra material that I ground out (see pictures below) which gave the job a nice contour, and actually, ended up providing the access I needed to remove the screw. Again, follow the cast seam and go for a bit of a ROUNDED finish instead of grinding down straight...this will ensure that you keep a more uniform thickness. I'm 100% sure I did not go as deep anywhere as was done in the provided Dremel writeup - meanwhile I did grind a larger surface area than in the writeup.
SINCE YOU ARE DOING THE DREMELING. YOU ARE RESPONSIBLE for how deep you go!
From my experience, I would find it hard for anyone being careful to get through the plenum wall....and if you do, I guess you're back to doing a plenum pull : )
You will periodically want to check to see if you have a good angle on the screw. In ended up not using a screw driver for removal of this screw at all, but the grinding was still necessary to provide clearance for my tool of choice. Experiment with different ideas until you are successful. More on this below.
You will soon clean up your grinding mess, but I would first work on breaking the torque on your retainer screws in case you end up needing to do a bit more grinding. Also, I took a little extra time to grind/polish and make the job look professional (pictures below).
Injector Retainer Cap Screw Removal
The original injector caps are "piece-of-crap" phillip head screws that soften, corrode, and "freeze" over time. The effort needed to remove them will vary from easy to extensive and frustrating. Even after you Dremel away at the plenum, you may find your angle with a screw driver is insufficient for removal of the screw.
When I replaced my #1 injector (no Dremel method), one screw came right out, while the other required the use of needle-nose Vise-Grips. Here are some pictures of that.
I WOULD SUGGEST that you use a BRAND NEW #2 Phillips, quality screwdriver, along with ScrewGrab (or an equivalent product) before even trying to loosen one of these screws. I DID NOT have this product at the time I did my replacements, but I've used it since and it seems to help. It took me a while to find this product, and I don't know if it will show up indefinitely on Amazon : )
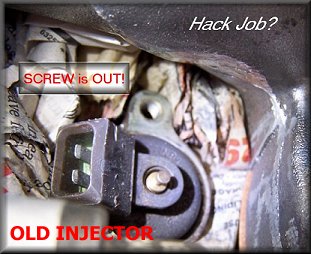
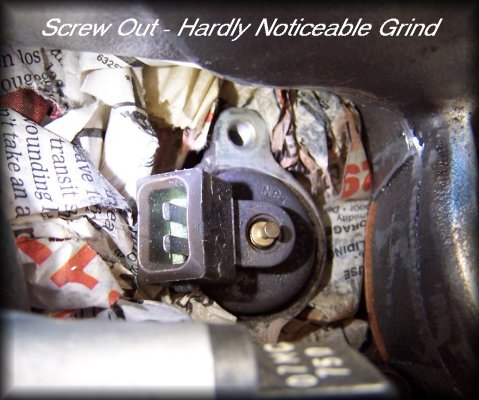
On my #6 injector (on which I used the Dremel Method), I had a clear shot at the more exposed retainer screw (on the right). Though it was pretty easy to remoave, I first wasted plenty of time trying to use a NEW #2 phillips screwdriver on it. I then destroyed the head trying to use a manual impact screwdriver. Finally, I used a set of 45 degree bent nose pliers. The end of these new pliers had sharp, deep teeth. The key here is to get a VERY GOOD GRIP -- Luckily, with a GOOD GRIP and a subtle turn, I felt the torque break loose. "YES!" Once you break the torque, these screws come out easily. I left the screw threaded and started to work on the other side -- keep it threaded while removing the opposite screw "just in case". Injectors have been known to shoot out if there is pressure in the rail (though not likely with old injectors as they are usually in there pretty good, as you will likely find out later). Once you have one side's screw loose, you can tap the injector cap (on that side) a bit to try to help alleviate the hold on the other screw.
The inner (left) screw on the #6 injector retainer cap is what this procedure is all about! Once you get it off, your home free! In the procedure provided above, I believe he cut deeper than I did, and in a more concentrated area (see picture below). My angle to the screw was not very good even after grinding, probably a 20* tilt, so I didn't even attempt to turn it with my phillips. If I had a longer #2 screwdriver (handle was hitting plenum making the entry angle larger) I probably would've had a good enough angle to try. Instead I tried to get the bent-nose pliers on the screw, but the motion and grip was impeded by surrounding items and the a piece of the plenum.
picture above from Dremel writeup - grind is probably deeper and more concentrated than what I did
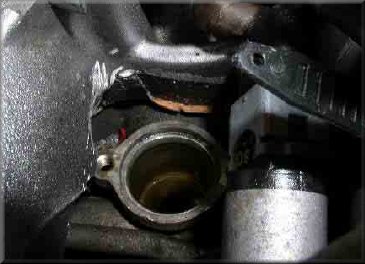
I was cautious about grinding any deeper than I had in one spot. My initial grinding was as pictured below. I realized I had more grinding to do (a nice reason to keep paper towels down there until I was SURE I was done - that is, until I had the screw loose).
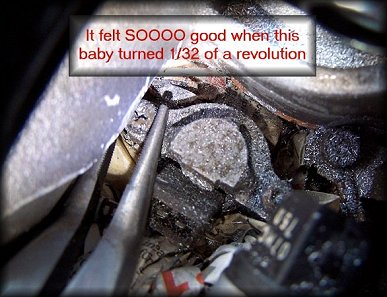
I decided to grind away some excess metal around the edge, which is explained throughly above. This turned out to be just what was needed. Once this excess metal was gone, I could get a better angle and grip on the screw with the bent-nose pliers. It turned out to be JUST enough - I heard the screw go snap. I worried at first that I snapped the head off Noooooo!. But, I swear to you, this first movement of the head was 1/32 of a turn, maybe less I had it loose!
For now, don't back out the retainer screws entirely! ... you will do this a few steps later...
THE HARD PART IS DONE!
Make it Look Good
If this was your first Dremel experience, you have probably found that you learn quickly - Dremels are cool. Take pride in your job and make sure you finish it off nicely. No hack job here : ) Make sure you have smooth transitions and no major scars or inconsistencies in your grinding area. Obviously your newly ground area will not share the original, pitted texture of the rest of the plenum, but it can still look good (as if just removing a rough cast seam). I polished the injector cap a bit (not to a perfect shine, but just to look nice). There are a bunch of aluminum parts on the Z that can be polished as nice as chrome if you take the time!

If the Dremel skipped on you a couple times and marked up surrounding areas, there's not much you can do about it. Trying to clean it up would likely result in a larger, unsightly scar. Since the rest of the unground plenum has a consistent, pitted texture, trying to smooth out a lonely scar is just going to make it worse.
Clean Up Before Removing Injector, then Remove Screws, then Injector
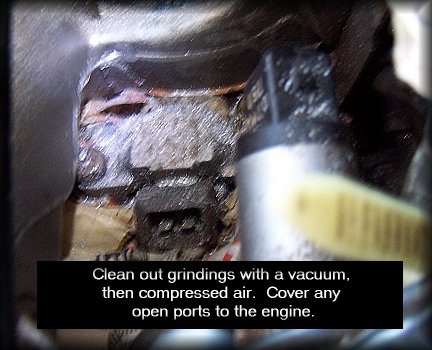
Once you have it looking good, you can now remove the paper towels. I used a Shop-Vac to clean up as many shavings as possible, then I used an air compressor nozzle to try to blow out any remaining flecks. If you cleaned up oil around the area before Dremeling, you will find it much easier to get the flecks out of the area. Make sure everything around the injector is gone -- you don't want an aluminum shaving down this hole!
REMEMBER TO WEAR safety goggles. Proceed to back out the retainer screws entirely. I noticed after backing the inner screw out a bit that it was going to contact the plenum (as noted in the writeup). Having this happen (and the severity) will depend on how much grinding you did. If it doesn't back into the plenum, you were more aggresive than I was : )
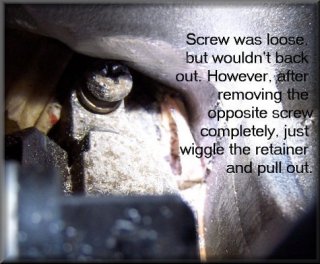
I thought I was going to have to grind more, which was too bad since I had already gave a finished look to the work, removed the paper towels, and cleaned up. But as the writeup explains, by removing the opposite cap screw the retainer could be angled enough to pull the screw out while still set into the retainer cap (completely unthreaded, but sitting in the cap hole). Just be careful not to lose any parts while pulling it out. Specifically, there is a half-circle washer under the retainer cap that is easy to lose. I actually had my magnetic tool sticking down around the side of the retainer while removing it JUST IN CASE the washer decided to drop.
Removing the injector itself may or may not be tough. When I did my #1 injector I spend 20-30 minutes tugging on it in different ways and finally had it come loose. The injector plug was totally destroyed. Some people have put a screw into the top and used the screw to pull up on the injector. On the #6 injector, I just got as good a hold as I could with pliers, turned back and forth while pulling upward, and it came out. Only took a minute or so of work on this one. It surprised me as I was expecting to sweat it out like on the first. Once you have the injector out, clean up the hole (certain to be some residue down there). I used throttle cleaner if I remember correctly. Plug up the hole if you aren't immediately placing the new injector in.
Installation is The Reverse of Removal - except...
...you are going to replace those dreaded cap screws with Hex head (Allen) screws.
Set the new injector into the hole as described in the injector replacement writeup. I soaked my o-rings in Olive Oil the night before as suggested by one post. They slid in easily and sat with limited force. Double check them to make sure they are seated.
Don't forget the half-circle washer needs to go on the injector first, then the cap. When putting the retainer cap back on the injectors, I had to set the hex screw it into the retainer cap and carefully lower them down as a unit, then start the thread. Using your ball-hex wrench, tighten down the hex screws a bit. I got mine hand tight, then gave just a bit of an extra turn. You now have pretty strong, fine threaded screws in aluminum holes -- too tight would ruin your day!
If you clean everything as you go and do a nice job finishing off your grinds, you will have a clean installation and a nice home for your new injector.
DONE!
THE ARGUMENT for DREMEL METHOD REPLACEMENT (yes, I am obsessed)
for those who still need some encouragement, here goes...
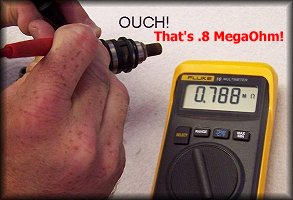
The other day (August 2005) I'm driving home from a nice round of golf and as I pull onto the freeway my engine loses a cylinder. Power is gone, car sounds like crap. I expected it was probably a connector, but after testing I found that my #6 injector failed. I was getting readings as bad as 6K ohm from the ECU harness. I pulled the injector plug (which incidentally took longer than replacement) and had readings around 6K - injector shot - read .788 MegaOhm on the "bench".
I should've checked this injector before as I was feeling a bit of hesitation the last few weeks. Losing another injector was somewhat expected, but still disappointing. I had replaced my #1 cylinder injector just over a year (10K miles) ago and they do tend to drop off like this, one by one. I replaced the #1 injector without removing the plenum - after waiting for parts, I had my car back up and running in a matter of hours.
Although some believe it's a good practice to replace all injectors at once to keep things equal (which is a valid idea), I feel as long as an injector/cylinder is firing without detonation or hesitation, there is no reason to do this. Being that I prefer to replace injectors as they fail, I will personally rely on the Dremel method of injector replacement, rather than pulling the plenum.
Don't be scared to replace an injector using the Dremel method. I have read and confirmed that injectors #2, #3, #4, and #6 have been replaced using this method, while #1 does not even require Dremeling to replace. I have not confirmed if #5 can be removed/replaced with the Dremel method, but I think it can be done. I have personally replaced #1 (no Dremel) and #6 (Dremel) and plan to replace any future failing injectors with this method (unless I have other reasons for Plenum removal).
The Dremel method is an effective way to change out an injector. Though many agree and have successfully replaced an injector this way, there are also many "Dremel method haters" who say, "Do it right - Remove the plenum to replace an injector. Dremel method is a hack job." For whatever reason, the Dremel method has gained a reputation among many of being a bad way to replace an injector. Almost religiously (see here, and many other posts) they will scare you from doing it. Based on my experience, this attitude is close-minded. Don't be demeaned or discouraged by this kind of response.
Consider this very basic hypothetical situation. If Nissan had designed the plenum as they did, but cleared out the excess metal to provide access to replace the injectors and then the FSM explained that to replace an injector you only needed to 1) Relieve fuel pressure 2) Remove FI connector 3)Remove injector cap screws 4) Remove injector Cap 5) Remove injector and replace...NO ONE WOULD BE COMPLAINING! I don't know who came up with the Dremel method, but just assume it was Nissan clearing out the excess metal to begin with : )
Assuming you aren't a person who can remove and reinstall the Z32 plenum in two hours, and assuming you have no other imminent reason to remove the plenum, the Dremel method is a suitable approach.
My argument: The Dremel method is innovative, easy, cheap, and effective and it doesn't have to end up looking like a hack job. Here is the science, speaking STRICTLY of replacing an injector (no other task to be performed):
The reason you remove the plenum to replace an injector is to give you access to the injector cap screws
The reason you grind away metal in the Dremel method is to give you access to the injector cap screws
So, plenum removal to access the screws ( see here)...or a bit of grinding? I feel the choice is obvious. Once you have the injector retainer screws removed, removal and installation of the injector is the same. Another advantage of using the Dremel method is that any subsequent injector replacements for that injector (direct fit upgrades, future failure) will be a cinch. In fact, I was told by MILO (San Antonio - see here) that part of his plenum chroming service to customers is to cut out the portion of the plenum that will give access to the injector cap screws in the future. Certainly if you pull the plenum and end up with a failed injector down the road, having the metal removed would be a great help.
That being said, THERE ARE many great reasons to remove the plenum and obviously there are a lot of things you can accomplish by removing the plenum that can't be accomplished otherwise. If you want to clean things up, replace several injectors, replace coolant hoses, seal up valve covers, replace harness/connectors/wiring, or even just learn, you have good reason to remove the plenum. Once the plenum is removed, injectors are simple to switch out. Some also recommend replacing fuel rails, grommets, fuel hose sections, and insulators around 100K (what I would call intense preventative maintenance).
The Dremel method should not be overlooked as a legitimate option. One major problem I have with removing the plenum (with no other reason) is that inevitably you see posts about how Z's are running poorly afterwards. Maybe not performed by experts, but it seems the problem is posted often. This often results in having the remove the plenum a 2nd time. If you replace an injector with the Dremel method, you have very little to diagnose should something not be working.
Another argument for using the Dremel method. After I got my new injector back in (using hex screws for the retainer) I realized I forgot to replace a little half-circle washer between the injector cap and injector, so I had to pull the retainer again. Took me all of a minute! To pull the newly replaced injector would've taken 5 more seconds. What an advantage - imagine if you found your half-circle washer sitting on a table after pulling and replacing the plenum. A plenum pull does nothing to save time on future replacements unless you take the time to grind away the plenum for future access while you have the plenum off.
If you have diagnosed one or two bad injectors, use the Dremel method to save time and money. The first injector you replace with the Dremel method will likely take a while because you will be thinking, researching, and tentatively getting the job done. You will likely spend a lot of time trying to remove injector cap retainer screws in odd ways, then finally find a way that works for you.
O.k...enough of that.
SUMMARY
The Dremel method rocks! Only a few things to worry about if something isn't right after you get things back together. A few quick checks resolve any problem (unless you grind through the plenum - ha!) Replace an injector easily without putting into peril your hoses, connectors, harnesses, and zip-ties (pretty much assumed expenses of removing a plenum the 1st time). Unless you have other reasons, time, and some $ to spend, avoid the pull and use the Dremel method.
-thumper300zx
thanks to all those who
have posted in the past and in response to my