
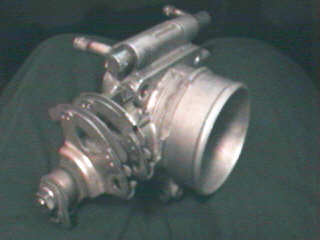
Why replace the 300ZX TB? The diameter of the Butterfly Valve is almost 1cm Smaller than the TB's used on the Nissan KA24(e) Engines, which happen to be a direct bolt on replacement on the 300ZX. So replacing the 300ZX TB with the larger diameter TB from an 89-91 240SX, Stanza, or Pickup will allow more air to flow/be sucked into the enigne. Now, you're gonna maintain the same diameters's below the TB (the cylinders/valve ports/intake manifold passages, etc), so this mod isn't gonna give you a whole lot of power, but the larger amount of air flow and slightly higher velocity will allow just enough more air/fuel mixture to be compressed in each stroke that it'll give you a little pep. Your engine will have an easier time breathing at idle and low RPM when the air isn't being sucked/flowing as much. Consider bronchitis...where your bronchial tubes swell up making it hard to breath..the 240SX TB brings down the"swelling" of the enigne's respiratory system. Better Throttle response will make the car feel a bit lighter, easier to control the revs, and smoother idling..and of course a bit of HP.
It would probably be more helpful to change calling this the "240SX TB Conversion" to the "Nissan KA24(e) Engine TB Conversion" (or the "Stanza TB Conversion")...I have yet to see the Nissan TB on a 240SX).
 After doing this mod I felt much better
low-end response...4th/5th gear runs are a lot more fun now also.
I took my car for a good 90 mile trip and hit the throttle
several times at 3K in 4th, and the quick response and
acceleration is much better. The car feels a lighter than before
and don't take this wrong and blow it up into a big discussion,
but driving my NA now feels a bit more like when I test drove my
Buddy Al's Turbo Z31. I remember an Eclipse and a BMW on the
freeway in San Diego come up in my rear view mirror going 100
while I was going 70 (this in the Turbo Z) and it seems as soon
as I hit the throttle the car just took off and I was caught up
to them in no time...I can feel a bit of that kick now after
having done the TB conversion.
After doing this mod I felt much better
low-end response...4th/5th gear runs are a lot more fun now also.
I took my car for a good 90 mile trip and hit the throttle
several times at 3K in 4th, and the quick response and
acceleration is much better. The car feels a lighter than before
and don't take this wrong and blow it up into a big discussion,
but driving my NA now feels a bit more like when I test drove my
Buddy Al's Turbo Z31. I remember an Eclipse and a BMW on the
freeway in San Diego come up in my rear view mirror going 100
while I was going 70 (this in the Turbo Z) and it seems as soon
as I hit the throttle the car just took off and I was caught up
to them in no time...I can feel a bit of that kick now after
having done the TB conversion.
At higher RPM I don't feel a difference. I suspected that I would so I was a bit dissapointed, but the low-end gain and smoother throttle response and idle make this MOD worth it. I've added some more statements below.
The labor for this modification is pretty straight forward, but varies depending on your approach and price came out to $60 for TB and about $20-$30 for various tools/accesories you will have to buy. I hear it's easiest if you can find a Throttle Body from a 240SX, Stanza, or Nissan Truck ('89-'91 year models w/KA24(e) DOHC 4-Cylider Engine) that has the word Nissan stamped on it (Nissan Part). Of course as luck would have it, I couldn't find an "available" Nissan one. The other type, which is also a direct Bolt on is the Hitachi type. On the 240SX's I found, I never saw anything but Hitachi. I never found a Nissan Truck, and the only Stanza I saw had the Nissan type, but it was part of a complete motor so they wouldn't let me buy it. It appeared on the Nissan type that you could just unbolt it and stick it right back on the Z with NO changes at all...the linkages (where the cables set into) looked to have the same construction and positions...while you'll see on the Hitachi model that the linkages would only allow about 30% of full throttle.
The Hitachi Model requires some changes, but they are simple. Here's some parts you need to convert to the Hitachi Type 240SX TB:
A 6MM allen type Socket (TB to Intake Collector Bolts), something to "bore" out the intake collector inlet (like a metal rasp...preferably one you can hook up to a drill or other rotary tool), some small craft type drum sanding tools/bits, and other little helpers.
A new TB gasket (one made for the TB, not for the Z...so if you get a 240SX TB, ask for the 240SX TB gasket)
A vacuum T...the 240SX TB has only one vacuum hose inlet. The 300ZX has 2...so you'll need to T the two vacuum lines into one to accomodate the 1 inlet available on the 240 SX TB (remember to keep in mind I had the Hitachi version...the Nissan version may vary).
At least one new coolant hose. I actually only had to buy one...Original hoses consist of a 90 degree and one that kinda twists around. The replacement hoses have to be about 3" longer to reach the top of the new TB, where the coolant inlet/outlets are. The 300ZX TB has them on the bottom. Also, the hoses will be a weird fit because the 240SX TB inlet/outlets have a smaller diameter than the 300ZX ones. Anyway, I bought 1 new coolant hose, a 90 degree with about 4" excess on the bottom and 1 or 2" excess up top. The old 90 degree hose I used as the new hose for the other side of the TB...so I didn't have to buy 2 new hoses. I bought all new clamps for these hoses, as well as replaced a few others. I don't like the original clamps AT ALL!!!
You'll also need various ratchets, sockets, wrenches, pliers, screwdrivers...
 The
labor time will be determined by your approach to the job. I
removed the driver's side valve cover for painting so I had to
take off the Intake Collector. This made it easier to bore out
the opening of the Intake Collector (I'll explain this part
later). If you choose not to remove the intake collector, you
have to be very careful not to let any metal shavings get down
into your intake manifold and down to the valves...very bad news
if you do...if you drop even one shaving, you'll end up removing
more than just the intake collector (if you plan to keep your
engine cylinders in good shape). I WOULD STRONGLY SUGGEST
removing the intake collector so your shavings can be cleaned out
throughly, even though it means you'll be doing a lot of
unhooking/unclamping, and you'll have to buy a new gasket (in
between intake collector/manifold). You should not have to remove
the intake manifold itself.
The
labor time will be determined by your approach to the job. I
removed the driver's side valve cover for painting so I had to
take off the Intake Collector. This made it easier to bore out
the opening of the Intake Collector (I'll explain this part
later). If you choose not to remove the intake collector, you
have to be very careful not to let any metal shavings get down
into your intake manifold and down to the valves...very bad news
if you do...if you drop even one shaving, you'll end up removing
more than just the intake collector (if you plan to keep your
engine cylinders in good shape). I WOULD STRONGLY SUGGEST
removing the intake collector so your shavings can be cleaned out
throughly, even though it means you'll be doing a lot of
unhooking/unclamping, and you'll have to buy a new gasket (in
between intake collector/manifold). You should not have to remove
the intake manifold itself.
Before starting anything, remove the negative battery cable and drain your coolant (draining from Radiator is all that's necessary). Remember to take advantage of your time and clean things up while your down there...don't skip details just 'cause you want the Z back on the road right away. Be patient and choose a good time to do this work (though if you buzz through it you can have it done in a matter of 3-4 hours).
If you don't plan on removing the intake collector you can skip the next paragraph.
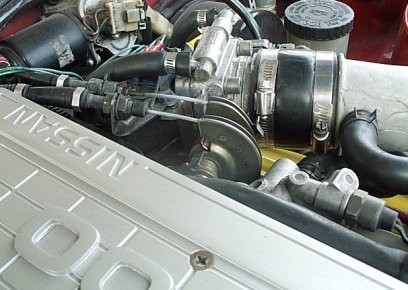
Remove the Collector Cover. Remove all the connectors and hoses from around the intake collector and label them as you take them off to remember their positions...(read directions in your Haynes/Chilton/Nissan Manual for how to remove the intake collector). You'll need to remove the throttle cables, intake hoses, and much much more. The Vacuum hoses that go from the idle solenoid and the cam covers, etc, can be very brittle. You may have to replace them. Remove the intake collector. Remember to mark connections...you are bound to forget a couple of them. Maybe even take a few pictures for reference. Get a couple plastic bags, some tape, and a marker to tag bolts, etc. Though its not completely necessary, I marked the bolts that hold down the intake collector in order to ensure I put them back in the same order. Make sure you mark your vacuum hose connections so you don't mix them up, and if you think you'll forget, do the spark plug wires also (Haynes shows you the way back). If you are planning on removing the cam cover in the process, you'll also need to lay back the AC compessor (again read serive manual if you have questions).
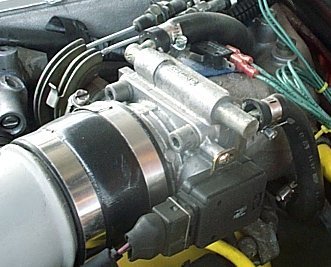
Remove the Throttle body by removing the TPS (Throttle Position Sensor...7MM bolts), the coolant hoses, vacuum lines (if still attached) and then remove the 4 6MM allen bolts. The TB may just fall off after this, but more than likely it'll have a little stick...just tap it lightly with a hammer or twist it with your hands a bit and it'll come off.
Don't throw the old TB away and also keep your
old TPS!!! You need some parts from the TB and the TPS is
probably car specific. Get your 240SX TB prepared by scraping off
any old gasket material (making sure not to scratch the Gasket
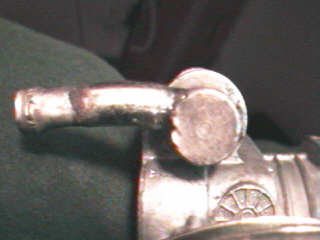
mounting surface). Now you'll need to dismantle it a bit. First,
you'll notice that it has two coolant inlet/outlets  on the top. You need to get them
faced another direction, esp the one facing straight up. These
coolant hoses actually pass through HOT coolant to keep the TB
from freezing up in cold weather...if you live in San Diego,
Phoenix, Miami, etc, you can just bypass these and hook the old
coolant hoses together with a coupler or a new hose that reaches
the whole distance. In fact, you should do 4this, because the hot
coolant warms up the intake air a bit...and you want it as cold
as you can get it. BUT for those of us who have snow in MAY, you
need the coolant hoses setup. These inlets will actually turn,
but in my case, I really had to get at them to turn them. I got a
cloth and a big ViseGrips, and then with a firm hold, I turned
them both around until they faced backwards (which is the best
orientation for them to accept the coolant lines). The outer
inlet (opposite the cable linkages) was much easier than the
linkage side, but you can do it!!! Try to grip them from the
bigger round part of the inlets...otherwise you may crimp the
inlets (you can see I did htis a bit). You will probably end up
stripping them quite a bit, but as long as you don't crack the
inlets or break through them, you'll be o.k. The inlets are not
threaded on, they just swivel...but they somehow stay sealed.
on the top. You need to get them
faced another direction, esp the one facing straight up. These
coolant hoses actually pass through HOT coolant to keep the TB
from freezing up in cold weather...if you live in San Diego,
Phoenix, Miami, etc, you can just bypass these and hook the old
coolant hoses together with a coupler or a new hose that reaches
the whole distance. In fact, you should do 4this, because the hot
coolant warms up the intake air a bit...and you want it as cold
as you can get it. BUT for those of us who have snow in MAY, you
need the coolant hoses setup. These inlets will actually turn,
but in my case, I really had to get at them to turn them. I got a
cloth and a big ViseGrips, and then with a firm hold, I turned
them both around until they faced backwards (which is the best
orientation for them to accept the coolant lines). The outer
inlet (opposite the cable linkages) was much easier than the
linkage side, but you can do it!!! Try to grip them from the
bigger round part of the inlets...otherwise you may crimp the
inlets (you can see I did htis a bit). You will probably end up
stripping them quite a bit, but as long as you don't crack the
inlets or break through them, you'll be o.k. The inlets are not
threaded on, they just swivel...but they somehow stay sealed.
Once you have the inlet/outlets facing backward, you'll need to transfer some parts from the Nissan TB to the 240SX TB. I got a string with a washer on the end to string the parts of the 240SX TB up so I could keep them in order for reference...first remove the end nut (on the side with the cable linkages). Pull off the smaller peices one at a time and string them up on the string to maintain their order. So far you have done NOTHING to the 300ZX TB besides pulling it off the Intake Collector. In my case I only pulled parts off the 240SX TB up to and including the Main Throttle Arm...I stopped pulling things off at the white washer (with a small cutout in it) and left that part of the assembly intact. If you pull these parts off, you'll have to reset spring tensions and that all turns into a mess. You had to remove an "E" clamp (small one) from the little bar in the rear of the TB (that the springs are hooked onto)...just put it in a safe place for later use.
Now get the 300ZX TB and pull off the end nut. Again, you'll pull peices off peice by peice...you may want another string with a washer at the end to keep track of the order of these peices. Pull everything off up to and including the Thottle arm (up to that white plastic ring with a cut out). Now, you'll transfer these parts to the 240SX TB...I used all the plastic/metal sleeves from the 240SX TB to replace the 300ZX ones, because the 300ZX ones were all broken, dry, and in bad condition. The '90 TB parts still looked really strong. So as you put the parts back, you may want to do this also. Place the throttle arm on the new TB shaft...you'll need to pull the spring back with a needle nose plier or something and then get the hook of the spring back onto the Throttle arm. Then you proceed with the other parts unitl they are all back on. As long as you pay good attention to the configuration of the parts as you take them off (and you do this twice, once with the 240SX TB on once with the 300ZX one, so you have plenty of practice), you'll be fine. By the way, we switched out the linkages because the throttle/cruise cables on the 240SX TB would have the Butterfly valve opening only about 30 degrees wehn we need a full 90. Once all is back on and the tension feels right, you can start preparing the intake collector.
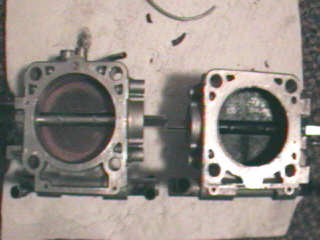
PICTURE OF COMPARISON BETWEEN DIAMETER OF TWO TBs - 240SX left - 300ZX right
On the intake collector, you need to match port the opening using the new 240SX TB gasket as a stencil. Put the gasket up to the Intake Collector and get the holes lined up (you could use a couple lightly threaded bolts to steady it a bit). Use the inner circle and draw a line as reference for the griding you're about to do. You'll notice that the Gasket circle is sifnificantly bigger than the intake collector hole...however, the gasket hole is also a bit bigger than the outlet of the new TB...so in theory, you don't need to grind it down to the line you made, but you may as well just to make sure you're hole is big enough. When you grind down the hole, first stuff a couple rags down the hole to make sure you don't get metal shavings down into the intake collector...ESPECIALLY IF YOU HAVE NOT REMOVED THE INTAKE COLLECTOR, you'll want to really make sure its is sealed adn that when you pull it out, nothing drops in. My car burns a lot of oil, and I had a lot of oil coating the sides of the collector, so even thought I sealed it off, some shavings still stuck to the sides. I throughly cleaned it out before putting it back on using TB cleaner (lots of it) and flushing it with water several times. Then I dried it out to make sure no water was left in the PVC and other emissions crap. Anyways, it came in real handy to have the collector out of the car to do this (hint hint).
As you grind the hole down, you'll want to try to taper the grind as you get deeper, until the grind is next to nothing. This will help with air flow. You don't want any sharp steps and you don't want to overgrind small sections and make the hole non-uniform. You really want to maintain a circular shape all the was around and DON'T overcut...match the line you drew as best as possible...NO Bigger, and if anything, just a bit smaller. What do you want ot use fo rthis part??? Many tools will do it, but I used a RASP (a cylindrical drill/drimmel bit with a metal cylinder and nasty metal bumps on the outside).
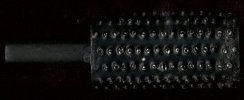
Rasp
Others mentioned aluminum BURS, cylinder hones, etc. DON'T try to use a grinding stone or drum sander...you'll just end up clogging them. They are pourous adn the aluminum is soft. Stones just fill up rapidly and become smoothened by aluminum. After you grind down the material to whre you need it, you can then use small dremel sanding drums to make the edges smooth and eliminate any sharp burrs that may be left. You can actually get the hole very smooth this way. Check the hole for roundness and again for burrs.
Now, you need to clear out your shavings...again, make sure they are ALL OUT...don't take a chance..you'll regret it. The heads are aluminum, too, you know. I just didn't fell safe at all doing this all with the COLLECTOR COVER in place....and as I said, I had other reasons for removing it. Now, slap on the TB with the new gasket and the rest is a matter of putting it all back together. You may have to adjust the TPS as you bolt it back on...how to do this or how to tell??? I don't know. Make the necessary adjustment for the vacuum hoses and the coolant hoses. Don't forget to tighten all the clamps. I'd hate to hear you got everything back on and forgot to clamp on a couple coolant hoses that may require removing the collector cover again...keep good track of what you take off, and the order you did them. The Hanyes WON'T show you everything you miss.
If you feel I've left some important details out, please let me know and write a description and addendum to this page so I can add it in. Get everything back on and take it for a test drive.
Now for my evaluation. The total cost to me was $60 for the TB, plenty of labor hours, and about $15 for miscellanous tools and parts. My battery was dead for some reason when I first went out to test drive it...so I jump started the car, and right at first I noticed a nice difference in Throttle Response. I took it around a few bends leaving the apt. complex and felt like this was gonna do more than I thought. Then I hit the main road (45MPH road) and hit the gas. It felt really good. Many people say they felt better high end response, but I actually felt the mod helped a bit on the low end. At the high end, and I may be fooling myself here, I actually felt like it didn't help at all. I'd say the TB had an overall positive effect...no drawbacks, no losses, but minimal gains. It felt about as significant as the intake/exhaust setup I have (before the fresh air intake). In other words, some better breathing, a bit more sound, and a bit more pull. At lower RPM it feels like the car shed a few pounds and the engine felt less burdened...it doesn't feel like the engine has to try as hard to pull in air...but at high RPM, it doesn't seem as significant...I'm still hitting 60 in second, though, in an NA!!! Also if you didn't read the first part, go back up to see how I felt the TB mod helped on freeway driving.
Worth it??? To me yes...I got other things done, cleaned up a lot and my old TB had a squeak you wouldn't believe (but it couldn't be heard over the engine...just when you pull the trottle with the car off. I think there are some rubber seals in the shaft going into the throttle chamber to seal it off, and one of mine was messed up so it squeaked upon throttle). The power gain is good enough for $80 (TB and Parts), and now I don't have to speculate what the 240SX TB would do for my car. I definately enjoy the throttle response and smoother idle.
![]()